

Understanding ‘designer speak’
Every industry has it’s jargon, and this is especially true for ‘designer speak’. It can make it difficult for ‘outsiders’ to understand.
It makes hiring a designer and understanding exactly what they’re telling even harder, adding to the confusion and stress potential clients often feel when dealing with design.
Here are some of the words and phrases you might hear, and what they mean in ‘designer speak’:
-
Brief
The initial instruction that a client gives to a designer, giving all the details that they will need for the design.
-
Visual/concept
The design/s that the designer creates, incorporating the client requirements and adding their create flair and expertise
-
Copy/text
These are other terms for words, all the words that will be needed in the design, especially if it is a leaflet or brochure. Copy tends to be used for bulk amounts of text such as in a brochure, and text tends to be used for smaller individual pieces of text.
-
Typography
Typography also refers to the words in the design, but refers more to how the different aspects such as size, style and alignment are combined together artistically to create a compelling design.
-
Font family
Font families – designer speak
This is the different style of the font that is used and how it best reflects the aim of the project.
These are:
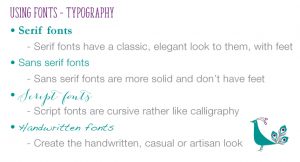
• Serif
• Sans Serif
• Script
• Handwritten.Each font family is suitable for a different type of target or sector, and creates a different feel in a design. Bad design often happens when the wrong type of font family is used.
-
Font
This is the style of the font itself, how it looks. There are thousands available online, which makes choosing the right one rather overwhelming. As with the font family, some fonts are better used, in one target or sector, than another. Getting it wrong, can again create a dissonance, between your design message and how the client perceives it.
-
Font weight
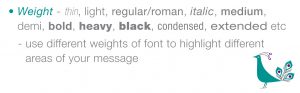
Font weights – designer speak
The weight of a font means whether is is ‘regular’, bold, italic, thin, heavy and so on. Some fonts, often those used for titles, come in just one weight. Others come in bold and italic as well. Some of the larger font families come in the usual weights, and extras such as narrow, condensed, extended and combinations of those such as narrow condensed. The most well known of those is Helvetica Neue and gives you complete flexibility.
-
Point size
This is the size of the type and start small and go as large as you need. The minimum point size for a business should be 7pt. However remember your audience and make it easy for them to read your message. The standard size for a leaflet is usually around 11pt, but the RNIB recommends 12pt when designing leaflet for those with sight problems.
-
Font hierarchy
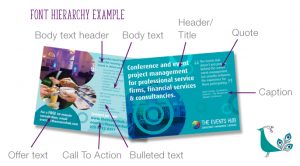
Font hierarchy – designer speak
This is the different levels of importance of text in a design or document, such as:
• Headline
• Subhead
• Body text
• Caption
• Pull quote (Where you highlight a quote separately as a graphic part of the design)Balancing these well means that your document is legible and easy to read, meaning your message is more likely to resonate with your target.
-
Resolution
This refers to the size of the image
• Large resolution – image more detailed and sharper – suitable for print
• Small resolution – image less details and fizzier – suitable for web -
DPI
This also relates to resolution and the sharpness. This is Dots Per Inch.
• 150 dpi – sometimes used for print – depends on the type of job
• 300 dpi – the standard resolution for print
• 72 dpi – the standard size for webImages with 72 dpi load faster on the web, but can’t be used for print, Make sure you supply your designer the right sized file.
-
Jpeg/tiff/eps/psd/bmp/png/gif
These are different image formats, some suitable for print and some only for web:
Print
• Jpeg – large resolution jpegs can be used in print
• Tiff – this is a large file and can be layered – not used so much no that jpegs are better quality
• Eps – this can either be a rasterised file – Photoshop (see below) or a vector file – Illustrator (see below)
• Psd – this is a layered rasterised Photoshop file
• Bmp – can be used for print – good if you can to colour up a black graphicWeb
• Jpeg – small resolution jpegs can be used on the web
• PNG – this is used for figures, diagrams basic images and screen shots
• GIF – these are simple animations -
Rasterised/vector
This is the type of image – how it is made up:
• Rasterised images – pixel based and are usually photos – this is why the resolution is so important. If there aren’t enough pixels in the image, it will be blurred.
• Vector images – made with lines so give sharp edges – good for graphics and illustrations – they are scalable without loss of resolution -
CMYK/RGB
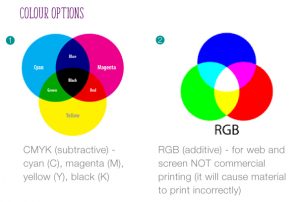
CMYK & RGB colours – designer speak
This refers to the type of colour:
• CMYK – used for print
• RGB – used for web, screen, TV etc -
Pantone/spot/PMS colour
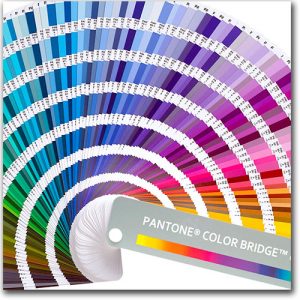
Pantone colour chart – designer speak
These are different terms for the same thing in print – colour. Pantone Matching System is a colour matching system – hence PMS. Like the paint swatches in DIY stores. Each colour has a number and can be matched by any printer across the country and the world.
It is a way of ensuring consistency in your brand and your marketing collateral. Each time your commission a piece of design work, you need to inform the designer what your brand Pantone colours are.
-
Low res pdf
In full this is low resolution pdf. This is the usual way that designers send proofs to their clients in this digital era. These will be small enough to send via email, and may not show sharp imagery. Do not send them on to a printer if you think the design is finished, they’re not suitable for print.
-
Bleed

Iconic Creative leaflet showing crop marks and bleed – designer speak
In a design context, this refers to images, shapes, colour and lines that ‘bleed’ over the edge of the design. When the printer cuts the project on the guillotine, if the paper slips, there won’t be a white line down the edge, so bleed is needed to stop this.
-
Crop/trim marks
These two terms are interchangeable. Crop marks designate the area/size of the project – for instance, an A5 leaflet. The designer will add the crop marks/trim marks when they make the final print ready pdf.
-
Print pdf/print ready pdf/camera ready artwork
These are all terms for the same thing. After Sign Off, the designer will create a final ‘high res’ print ready pdf. This will have crop marks, bleed, be high resolution and suitable for print. Sometimes, particularly if the printer is a news publishing, or signage making company, they may require a final print pdf with a specialist type of high resolution pdf. Check with your printer.
Camera ready artwork is the old fashioned term, used when artwork was physically created. Each piece of artwork had to be put under special camera to make the printing plates.
-
Proof
Once the printer has received the high res pdf, they will create a proof after running the pdf through their print setup software. Nowadays this is a called a ‘soft proof’ – a digital pdf they will send on email or via a link.
Check this thoroughly. Sometimes when a pdf is run through this software (or ‘ripped’), elements can disappear, or stray items can appear.
If your print run is a huge magazine or brochure, probably being produced lithographically, it is highly advisable that your ask for a physical proof of each page. This shows each spread/element in the closest colour that you will get with out actually printing. This lets you can check colour consistency more easily. It also allows you to check the ‘pagination’ (order of pages) is correct.
Hopefully this guide has helped you feel more confident in understanding ‘designer speak’.
Check out the 13 key steps in the design process in this blog
To see more examples of the extensive design work I’ve carried out for my clients visit the Design page of www.iconiccreative.co.uk.
To discuss your design requirements email me at info @ iconiccreative.co.uk or call 0775 341 3005.

One thought on “Understanding ‘designer speak’”
Comments are closed.